Are you keen on learning how to create a blog? A laptop, an idea, an internet connection are all you need to create your own blog today. No programming, design, or technical skill is required.
Having a blog can be a great advantage for your career, but to get one up and running, you feel a little lost in the backwaters.
If you want to start a blog but you’re an utter newbie when it comes to technology and isn’t sure where to start, this article is for you.
In this post, I will show you how you can create your first blog even if you don’t know how to turn on a computer.
SEE: Best Blogging Platforms for Beginner & Experienced Bloggers
How to Create a Professional-Looking Blog Without Coding
Below are the steps to create a blog as an utter newbie with no techie skill:
1. Mindset Shift
If you want to get anything out of your website, this is the initial action you should take.
You must decide whether or not to accept the fact that blogging entails a significant amount of effort. Several successful bloggers will not give this information to you.
Writing your blog piece, formatting it, and promoting it will take up the majority of your time, especially if you are not a full-time blogger.
You should also be aware that results will take time to appear. If your goal of creating a blog is to get wealthy in a week, the truth is that blogging is certainly not for you.
It would take 3 to 4 months on average for your post to gather momentum on Google. In blogging, being consistent is everything. Don’t expect to get a lot of attention to your site by posting a couple of articles.
It’s important to remember that there’s a link between the number of articles and traffic. That is, the more posts you have, the more search terms you will rank for.
To add, the more visitors your website will receive as a result. None of these are meant to frighten you, but rather to prepare your mind for the clear task ahead.
2. Niche Selection
This is an area that most beginners ignore. They generally do not give enough consideration to this issue or find it tough to cut down to a certain area in which they can excel.
Don’t only look at other established bloggers who have been in the game for a long time if you want to start a site in the same area.
Let me simply say that if you choose that path, you have just purchased a recipe for disaster.
This is an important step. Your success is mostly determined by the specialty you select and the amount of money you make. Here are some examples of common niches to investigate:
- Health & Fitness
- Motivation
- Money and Finance
- Self-development
- Love and Relationships
The level of competition in the niche should also be considered as well. For instance, you don’t want to start a blog in a niche where your competitors have years of experience. Search for niches in which even fresh blogs can rank for high-volume keywords.
3. Choose a Blog Name
Now that you’ve decided on a specialty, we can move on to setting up your blog. The succeeding step is to choose a name for your blog.
When choosing a website name, there are a few things to keep in mind. You want it to be memorable, as short as feasible, easy to spell, and remember. Avoid using numerals or hyphens as much as possible.
After you’ve decided on a website name, try Googling for it to see if maybe it’s already taken. That’s amazing if it is. You now have two options if this is not the case.
Keep looking until you locate an available name. It’s what I strongly suggest you do until you locate an available name.
If you want to speed up the procedure, on the other hand, I advise using your actual name. The justification for this is that if you subsequently alter your website name and do not use your real name, you will have to start over.
There are many flaws in blogging that can be remedied afterward, but having an incorrect web address is not one of those.
Understandably, it’s merely a name. Personalized website names are significantly more customizable. So switching from one skill to another after a few months isn’t a big deal.
Simply delete any old information that isn’t related to your new path, and then start adding new content. However, using your name has a substantial scalability disadvantage.
Recruiting additional writers and developing your site beyond your brand will be much more difficult in the future.
If this is your first website, the benefits of using your name much outweigh the disadvantages, which will become obvious later.
4. Choose a Content Management System
You need to be conscious of your needs, ability level, and the objectives of your blog when it comes to selecting the best website platform.
It’s important to think about whether you prioritize flexibility or convenience of use. It’s also critical to select a platform that will allow your website to grow in the future.
It can be tough to migrate a blog to a new platform later on. There’s no reason to start from scratch when using a CMS.
There are various CMS systems available, but WordPress is by far the most popular, powering nearly half of all existing websites (about 42 %).
WordPress is a content management system that is both free and open-source. Since it is self-hosted, customers must first purchase web hosting and a domain name. The program is open source and invites users to collaborate.
5. Purchase Domain Name and Hosting
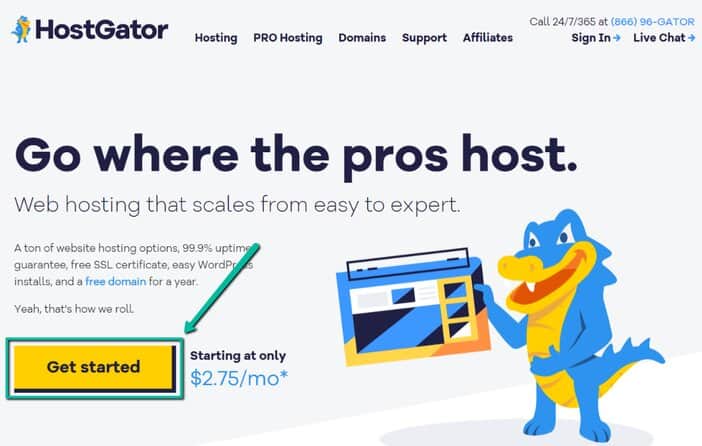
To get started with HostGator, click here. Click on the “Get started” option from the HostGator homepage.
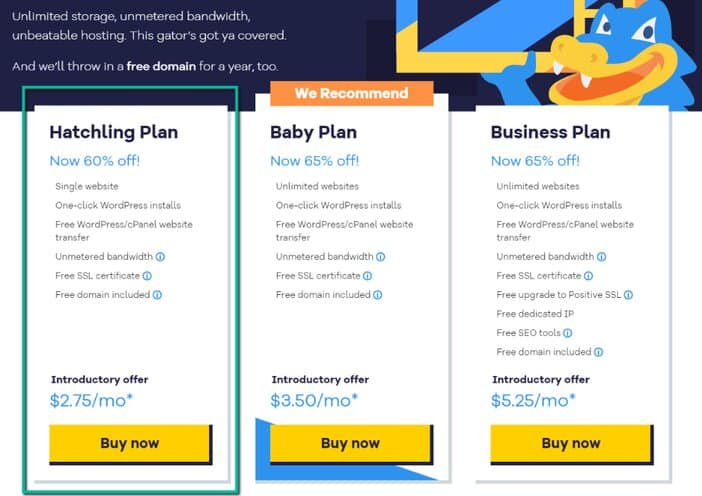
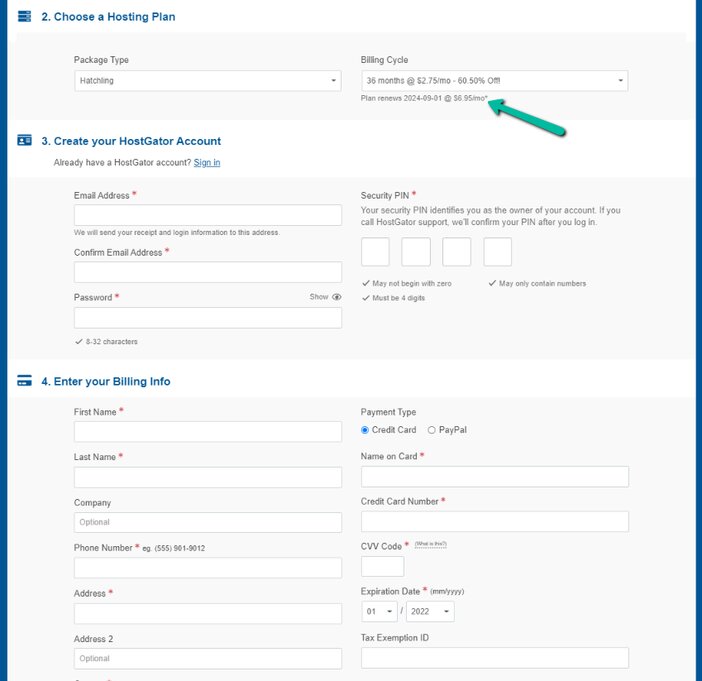
Doing so will take you to a page where you are to select a preferred HostGator’s plan. If you are just starting, I recommend going with the “Hatchling Plan“
You’ll then be required to choose a free domain name for your blog. Once a name is provided by you, HostGator will try to confirm if that name is still available for usage. Otherwise, you’ll need to provide another name.
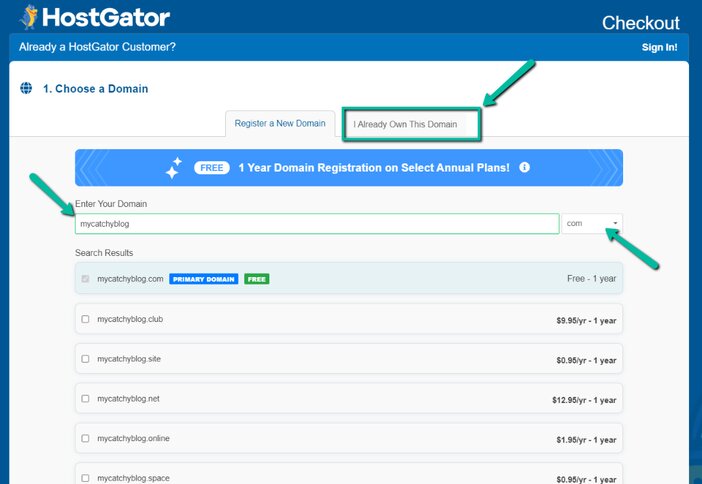
Do know that the free domain name is only valid for the first year of usage after which you’ll be billed $17/yr.
NOTE: If you already have a domain name, you can skip this whole process and just click on the “I Already Own This Domain” located at the top of the page, to provide your already existing domain.
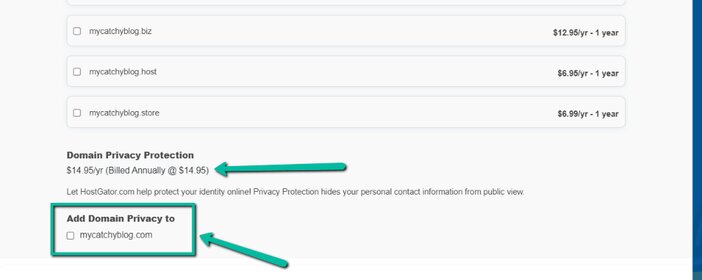
One more thing, please uncheck the box prompting you to add domain privacy, it comes with an extra commitment of $14.95/year. Only go for this if you truly need it.
After that, just continue with the account creation process as it is just a straightforward process. You have to also bear in mind that HostGator just as it is common in the web hosting industry, comes with a high renewal fee.
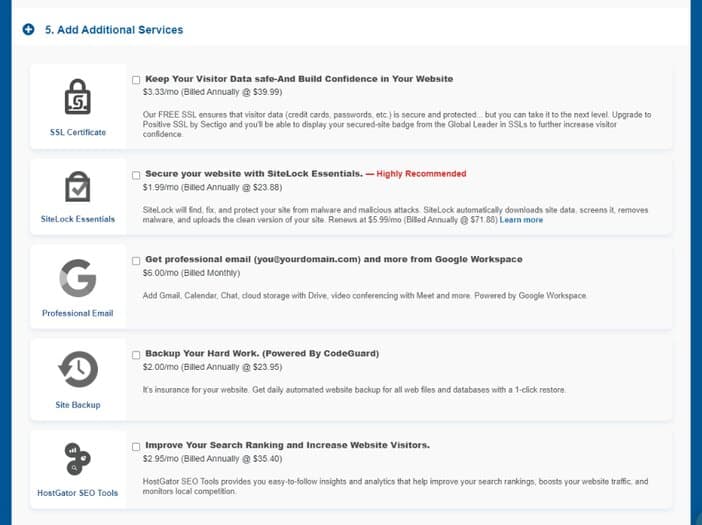
Before hitting the checkout button, please skip what you see in the “Additional Services” section except you will require any of those.
Finally, it’s time to confirm your entries and then checkout. If you have a coupon, you can insert it in the space provided.
Alternatively, if HostGator has any coupon code still active at the time of your registration, it will be automatically inserted for you.
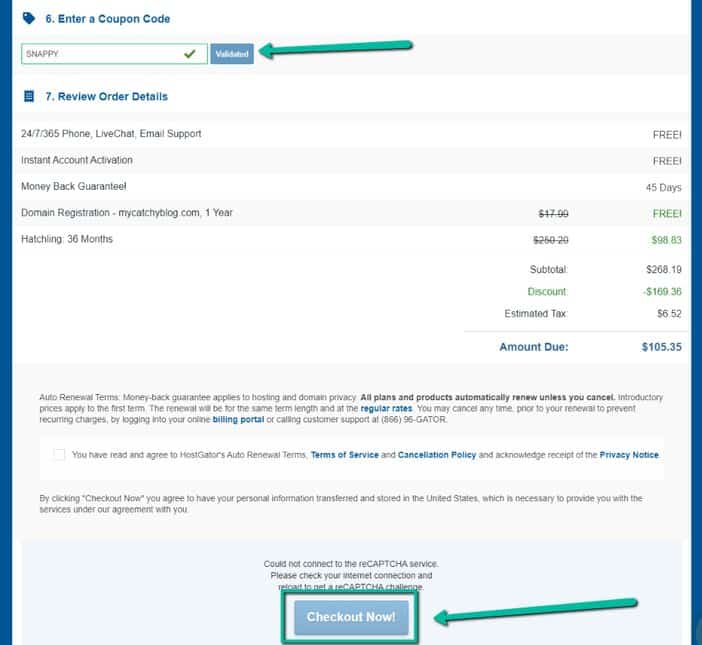
From here onwards, HostGator will process your payment and then lead to where you’ll need to install WordPress, which is so easy to do.
How to Start Using WordPress
When you’ve finished installing WordPress, utilizing it is as simple as turning a flywheel.
This is because the WordPress dashboard has an easy-to-use interface that any newcomer should be able to understand in no time.
Don’t worry, this article will cover everything. Logging into the WordPress dashboard is the first step in getting started with WordPress.
Use the following link to access the backend of your WordPress site: https://www.mycatchyblog.com.com/wp-admin.
Replace “mycatchyblog .com” with the name of your blog. You’ll be routed to a page that looks like this.
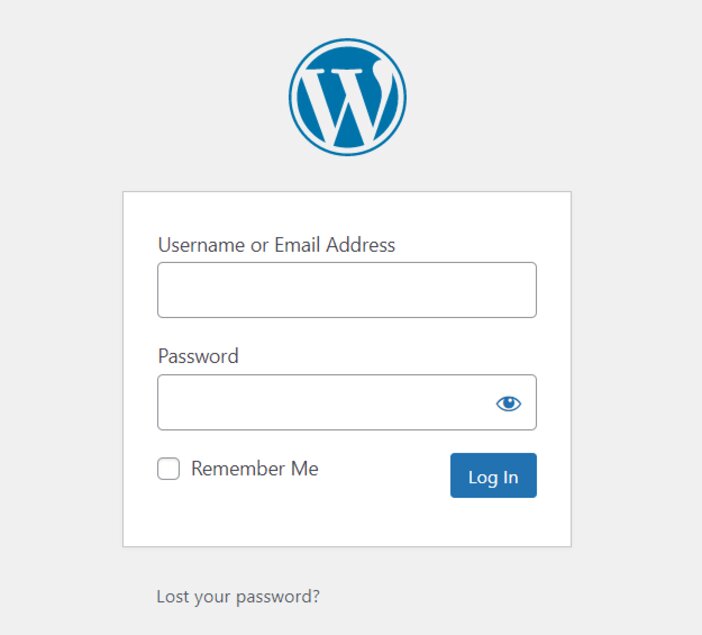
Please use the username and password you set when installing WordPress to log in.
This is how your WordPress back-end interface should look.
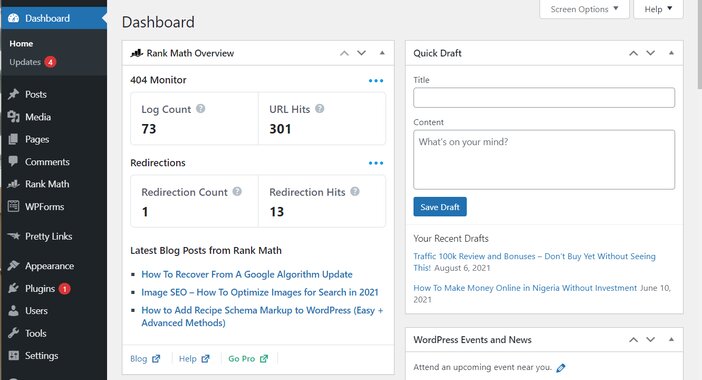
You can play around with it just to get a feel of it. After that, you’ll be able to proceed to the next stage.
6. Design Your Blog
You’ve decided on a blog name and have installed WordPress on your domain, which you can use to start monetizing and doing whatever you want.
You’re almost prepared to start writing, monetizing, and driving traffic to your blog, but there’s one last step you need to take. Design is what that is.
There will be no challenging tasks for you to complete during this phase. WordPress makes it quick and straightforward to create a stunning blog.
You can instantly change the look of your WordPress site by adding themes after logging in.
There are dozens of themes available online, many of them are free. Once you’ve found a theme you like, install it and configure it on your WordPress blog.
Most themes don’t require you to use the default design. Some themes allow you to alter them further using the customize area of your WordPress blog.
Every theme is distinct and offers a wide range of customization options. Study the instructions that come with any WordPress theme when you originally installed it if you want to know what changes you can make.
The theme documentation outlines what changes you may apply to your theme as well as how to go about it.
WordPress themes can be found in the themes section of your WordPress website or by searching the web. Try downloading and manually import the file if you opt for a paid theme.
7. Installing a WordPress Theme
Hover over “Appearance” on the left-hand side to install a WordPress theme. Select “Themes“ from the drop-down menu.
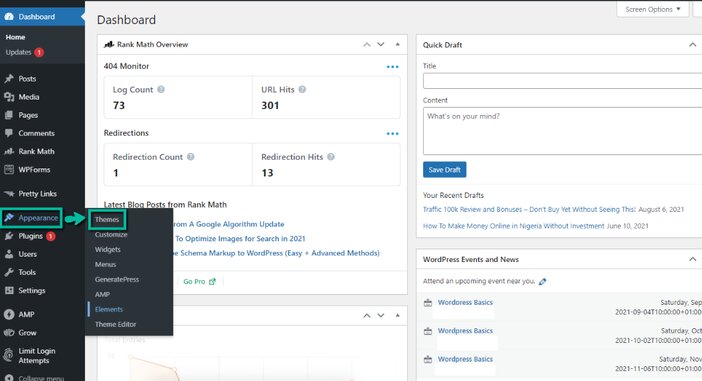
Click the “Add New” button on the following page to get to a website where you can look for WordPress themes.
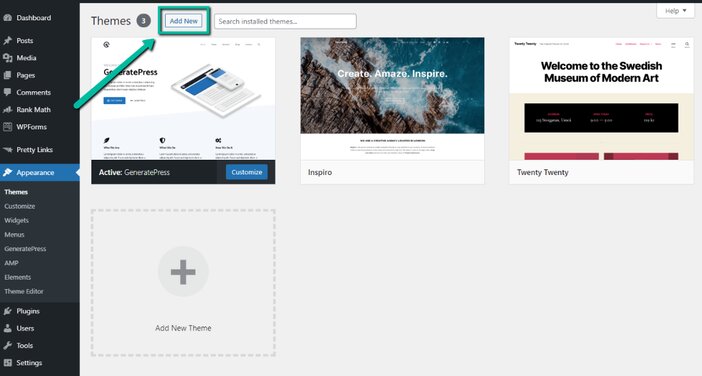
After that, you’ll be taken to the WordPress themes directory, which looks like this.
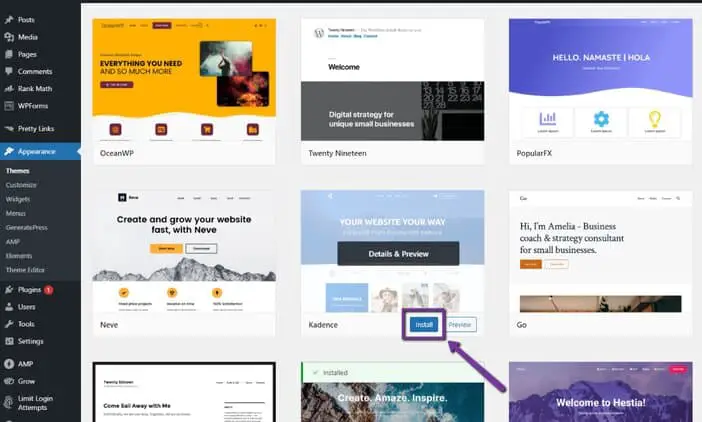
There are several themes to pick from, as you can see. Some are paid, while others are free. Don’t go crazy and get a premium theme right away if you don’t have a lot of cash. They can be quite costly.
To get a feel for how things work, start with a free theme. It’s important to remember that you can change it at any time. A pre-installed theme is included with every WordPress blog by default.
Find the search bar in the upper right corner and type in the name of the theme you wish to install.
After you’ve found it, click “Install” and then “Activate” to make the theme live on your blog.
Click on “Customize” to further customize and design your blog.
SEE: Best Web Hosting Services for the Money
8. Installing Plugins
To install new plugins on your blog, you must first download them from the WordPress plugin directory.
If you want to get to the plugin directory, navigate your mouse over “Plugins” on the left side of your WordPress dashboard interphase and choose “Add New” from the options list.
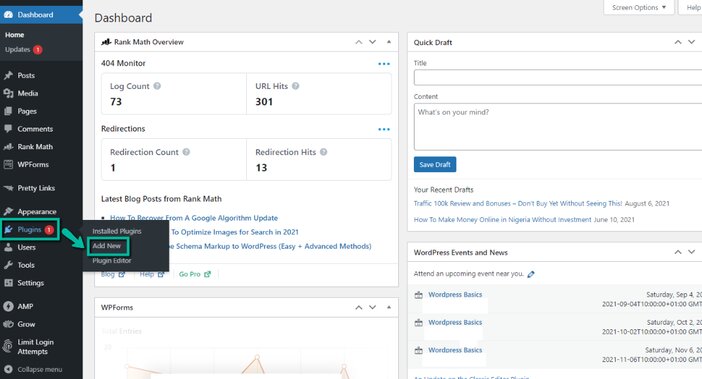
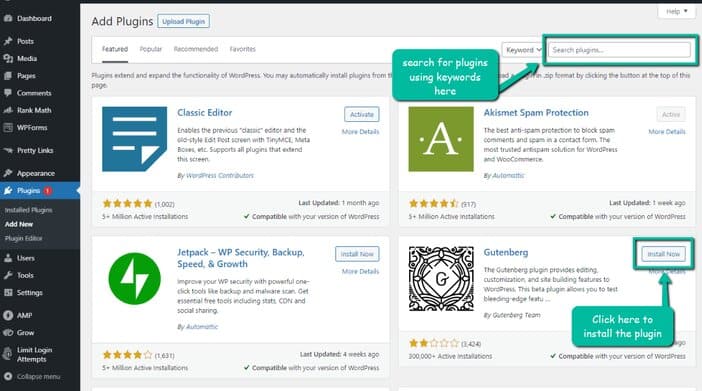
In order to install a plugin on your blog, locate the search bar, type the name of the plugin you wish to install, and then click the “Install Now” and “Activate” buttons, as appropriate.
How to Installing a Paid Plugin
In rare circumstances, the plugin that needs to be installed isn’t available in the WordPress plugin directory. However, it may be downloaded or purchased individually online.
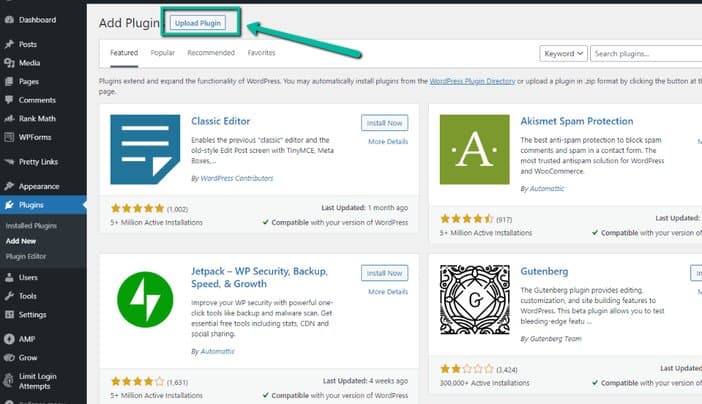
Click the “Upload Plugin” button in the top left-hand corner of the plugin installation page.
To install the downloaded plugin, go to the screen that appears and click “Choose file.”
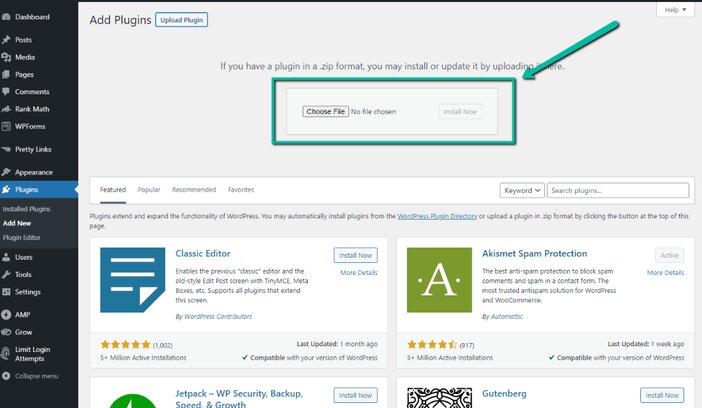
A pop-up window will appear. Locate the plugin you want to install on your hard disk and double-click it to open it.
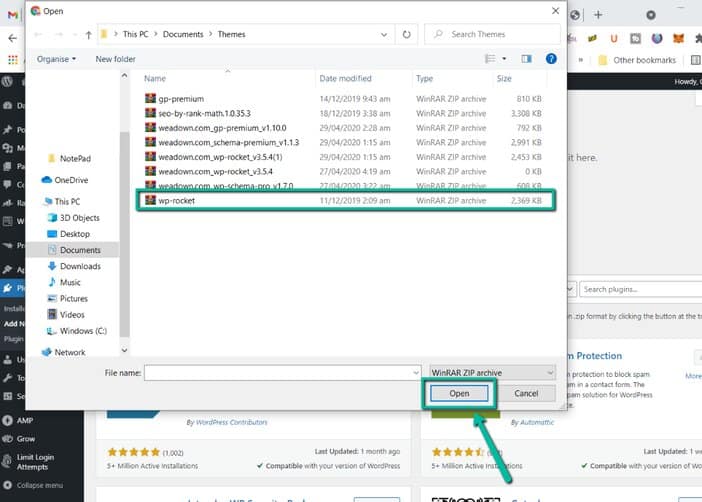
It will display the plugin to be installed. To begin the installation of the plugin, click on “Install.
This will lead you to the page that will walk you through the installation procedures. When you’re done, click “Activate” to activate the plugin.
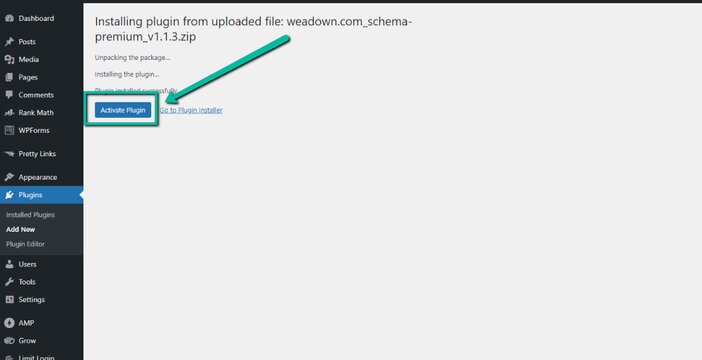
With the aforementioned steps completed, you are now ready to install any plugin of your choosing. It doesn’t matter if you get it through the WordPress plugin repository or a third-party vendor.
How to Delete Plugins
Follow the steps below to begin the process of removing any plugin from your blog:
Log into your website’s backend admin area.

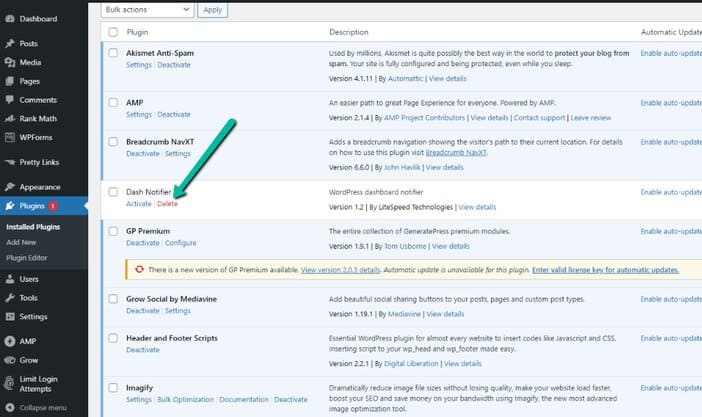
On the left side of your WordPress admin area, look for “Plugins” ==> “Installed Plugins.”
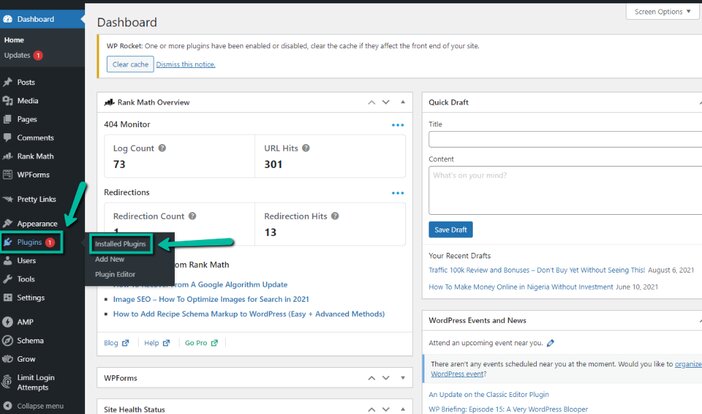
This will take you to the area for installed plugins. Find the plugin you wish to remove or delete. Underneath the plugin’s name, click “Deactivate.”
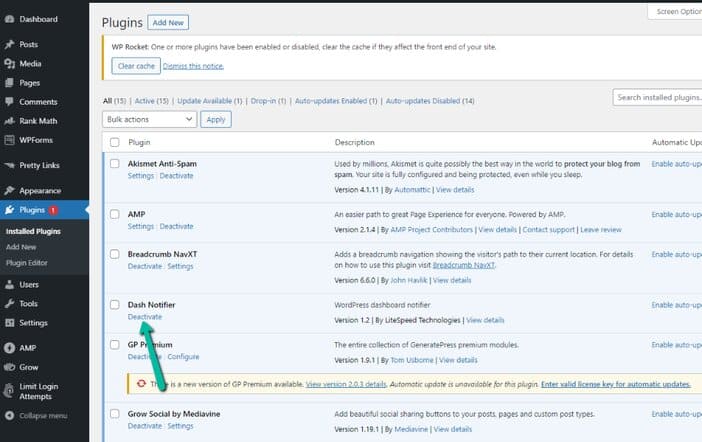
The term “Deactivate” will be replaced with “Delete.” Afterward, click “Delete” to completely remove the plugin from your website permanently.
9. Optimizing Your Website Post URL
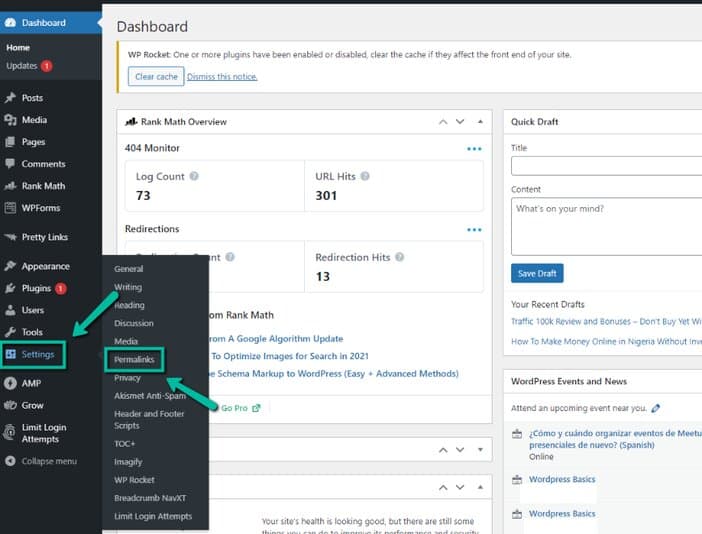
This setup must be completed for your blog post to have a search engine-friendly URL. On the left side of your WordPress dashboard area, move your mouse over the “Settings” button.
From the drop-down menu that opens, choose “Permalinks.”
After picking “Post name“, hit “Save Changes.”
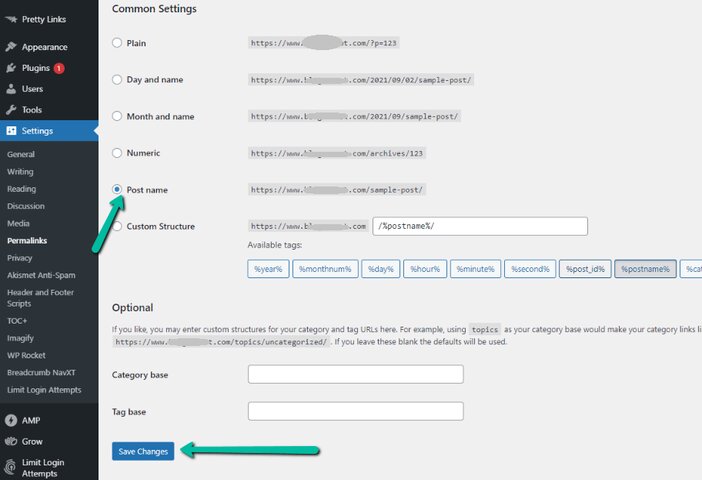
Instead of https://www.mycatchyblog.com/p=123, your post’s URL will be https://www. mycatchyblog .com/post-title.
That means that rather than https://www. mycatchyblog .com/p=123, the URL for a blog post named “best website builder” will be https://www. mycatchyblog .com/best-website-builder.
10. Adding Pages on WordPress
To begin, go to Pages » Add New in your page editor and build your first page.
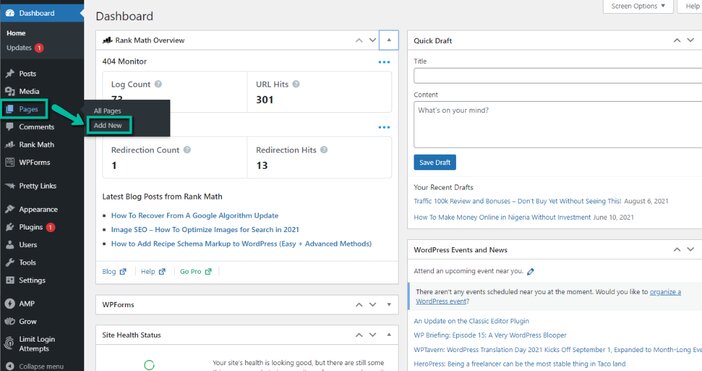
You’ll see the editor, which is where you’ll begin building your page. Before you begin entering contents in the page editor, you must first give your page a title.
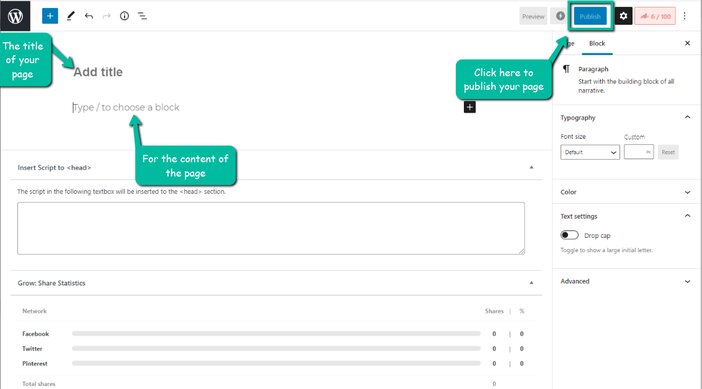
Just write the title of the page in the space below and proceed to write the page content. When you’re through, click “Preview” at the top of the page to check how the page will appear.
If you’re satisfied with the outcome, click “Publish” to make the page public. If you’re not happy with the final result, make modifications before publishing it.
Must-have Blog Pages
Pages are necessary for any blog, irrespective of its purpose. The list below is the most pivotal pages for your blog:
- Contact Us
- About
- Policy Privacy
- Terms and Condition
- Affiliate Disclaimer
11. Adding a Post to Your Blog
The section of your blog from which posts can be added is what you will mostly be making use of as a blogger. This is because most of your blog content will be published using this medium.
Click “Posts” and then “Add New” in the WordPress dashboard to create your first blog article.
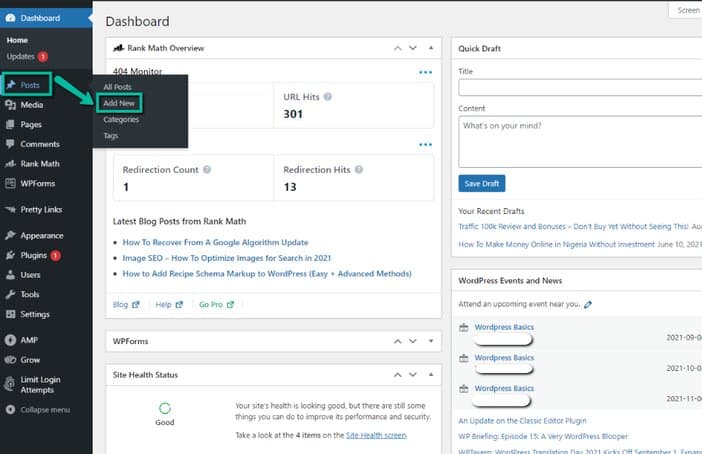
This will open the WordPress editor, where you can begin composing your article. Simply put the title of your blog post and then begin writing the body of the post beneath it.
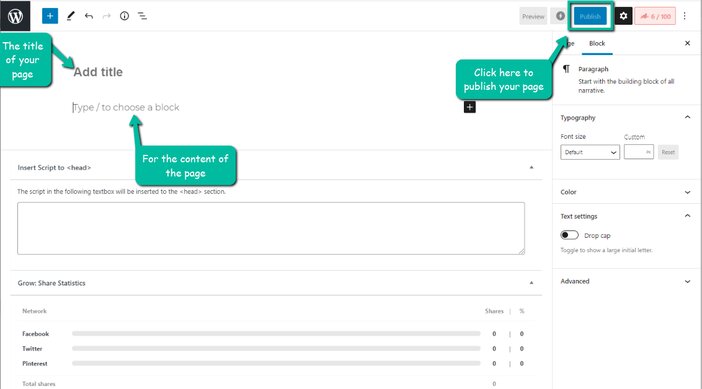
Follow the same instructions as you have when adding a page above in this regard. To put it another way, compose your article title, create your post content, preview it, and then publish.
How to Get Blog Post Topics
What to write on has usually a problem for most rookies just getting started. There seem to be a lot of viewpoints to listen to when you search the web for assistance.
This has caused many beginners to be indecisive about what to believe and follow, thereby obliterating their capacity to generate quality blog posts.
Some people support keyword research, while others push for long-tail keywords. Regardless of how you go about it, you’ll need to invest in some expensive software.
But just now, you’ll learn how to generate a plethora of prospective blog post ideas and topics. There’s no need for costly software or wasting time overcomplicating the entire procedure. Let’s start with the first spot where you can come up with a plethora of blog topics.
1. YouTube Autocomplete Feature
While you may claim that YouTube is solely a video-sharing platform, you should be cognizant that some YouTube videos do appear in Google search results.
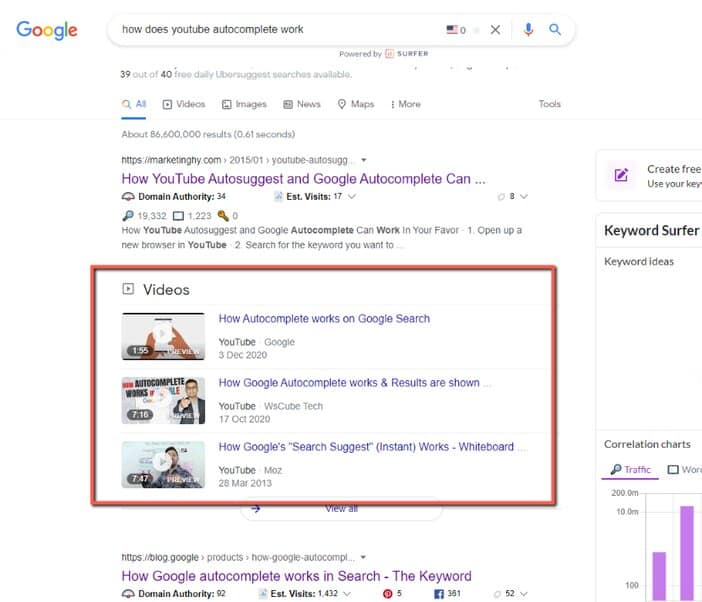
Those keywords that have been suggested to you by YouTube are what viewers are typing into YouTube regularly to find information on those keywords.
It’s advisable to pick a keyword from what’s been suggested and turn it into a blog post. If you’re just starting, this will help you get some visitors to your blog.
However, for this strategy to be successful, you’ll need to focus on long-tail keywords. These phrases are referred to as ultra-specific because they address a visitor’s true search intent.
Long tail keywords are defined as those that are longer than three words. Simply locate the search box on YouTube and begin putting in the keywords you wish to target. You’ll see that YouTube will attempt to propose other keywords for you.
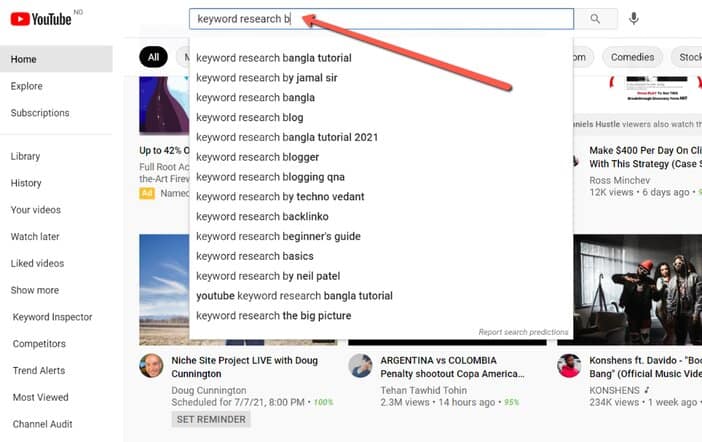
One thing to keep in mind is that these keyword suggestions aren’t just suggestions from YouTube; they’re predictions made by YouTube based on searches conducted by other users.
So all YouTube does is show you are the most popular results from those searches. Remember that the higher a keyword is on the list, the more important and searched it is.
Also, if you opt to start typing in alphabets following your seed term, the autocomplete functionality will still operate.
Note: The result of the YouTube autocomplete tool is not guaranteed and may alter over time as trends shift.
2. Quora
This is a question-and-answer platform that provides insight into the types of questions that people are searching for solutions to.
You can use the questions that come up on Quora as a basis for a blog post. When you do a Google search, you’ll almost always see a Quora answer on the first page.
This is because there aren’t enough blog posts on that keyword. Go to Quora and use the search bar to start collecting blog content ideas.
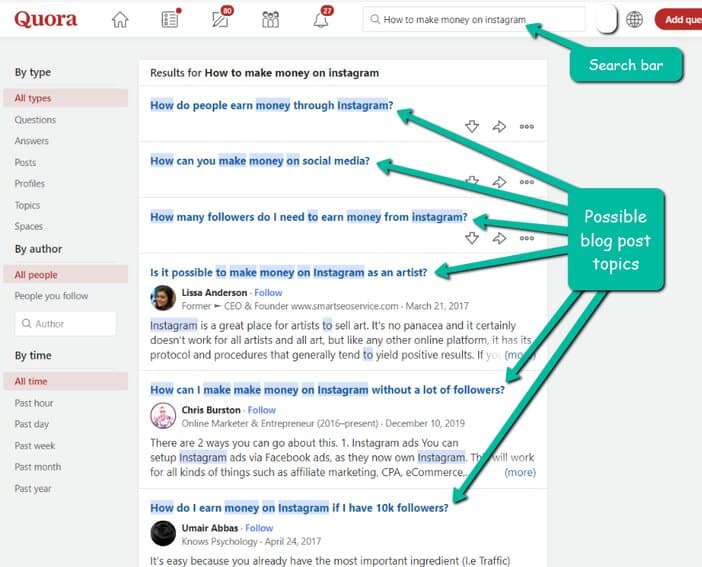
Continuing with our scenario, you will notice that people are asking questions. To come up with blog content for your blog, simply use these questions as blog post ideas.
3. AnswerThePublic
This is the one resource I rely on to generate a slew of keyword suggestions for me. AnswerThePublic is a website that collects and organizes online inquiries and queries.
These are long-tailed and less competitive keywords because they are inquiries that users are asking online rather than information-based keywords.
To utilize AnswerThePublic, simply go to the website’s homepage and type in your seed keyword in the search field.
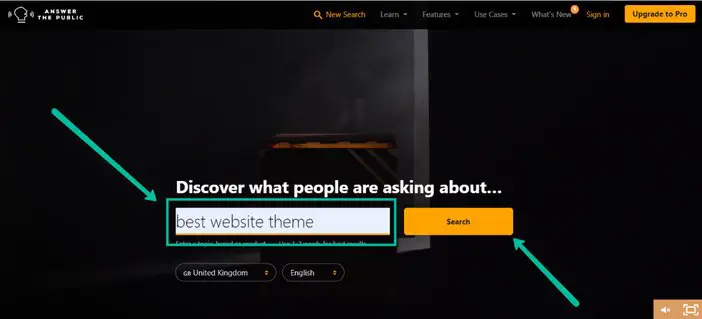
After that, all you have to do is sit back and wait for it to finish its work. When it’s finished, it’ll give you dozens of keyword suggestions.
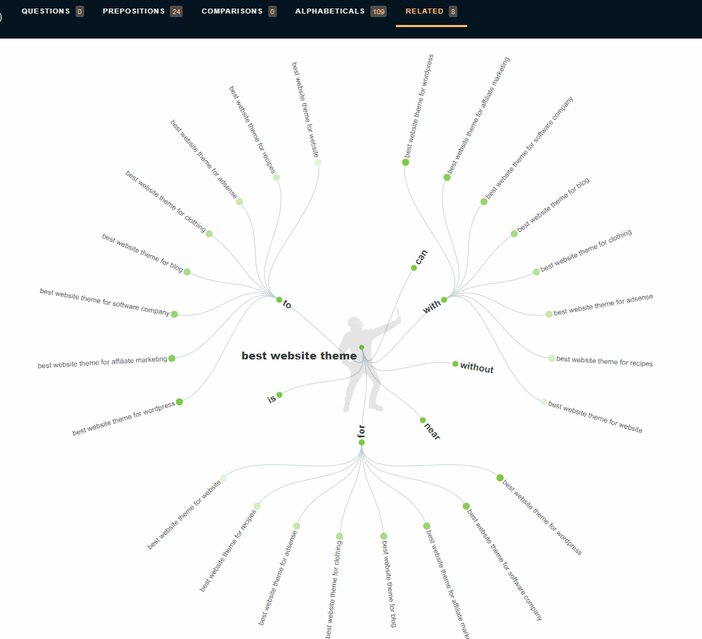
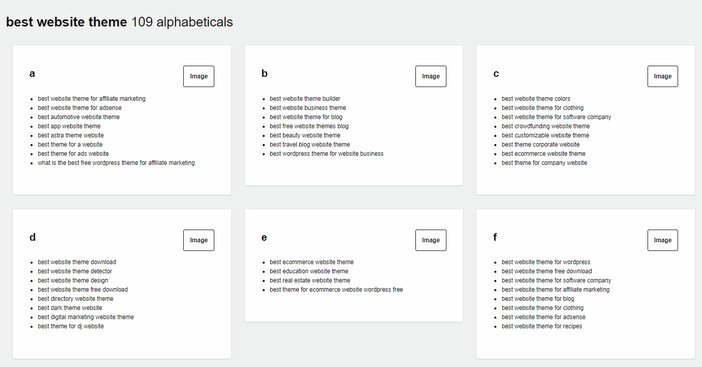
Continue scrolling down the page to the area where all of the keywords it was able to produce are listed alphabetically with your seed keyword.
How Do You Promote Your Blog?
It doesn’t matter how good or insightful your post is if no one reads it. You won’t like to put in all your work only to have it go unappreciated or remain dormant.
So, as a newbie, how do you get people to read your blog? To keep things simple, we’ll look at seven different approaches.
It’s worth noting that as a beginner just getting started, it’s best to focus your efforts on the things that will help your blog grow in the first place. So, how can you publicize your blog and get people to visit it?
1. Make a Twitter post
For webmasters, Twitter is an excellent marketing tool. Using hashtags that are pertinent to your audience is one of the best methods to get your post seen.
Hashtagify, a free application, enables you to look for hashtags you’re thinking about using and see popular related hashtags.
You may discover popular hashtags to utilize in your tweets using Hashtagify. Just be cautious not to use several tags. To prevent being spammy, limit yourself or two to three.
If there’s no time to spend on Twitter, try scheduling and planning your social media posts for the week with TweetDeck.
2. Using Pinterest Groups
Pinterest is one of the most underappreciated ways to increase blog visitors. If you utilize the appropriate method, engaging with other people will increase your website’s traffic.
A Pinterest group board contains multiple contributors and is identified by a little two-person emblem in the bottom right-hand corner.
Group boards have a larger following than regular boards, which means more users will re-pin your article and visit your website.
PinGroupie is a great place to find groups boards in your niche. This free tool displays the number of subscribers and re-pins on any board.
If you wish to join a group board, you’ll normally need to email the board’s owner to request an invitation to pin.
3. Blog Commenting
While leaving comments on prominent blogs in your niche may appear to be a time-consuming task, it is nevertheless one of the most effective ways to drive traffic to your website.
Rather than flooding other websites with your site URL, write intelligent comments about the blog’s content and include a by-line with your website link. This is a legitimate method of bringing new visitors to your site.
Set up Google Alerts for similar phrases to be notified when blogs write about a topic on which you can comment.
4. Using Pay-Per-Click Ads
One of the most effective ways to obtain visitors, leads, or customers is to participate in online advertisements.
Online ads, unlike traditional marketing, allow you to laser target your potential clients. As a result, you’ll be able to use your advertising money more wisely and generate more cash.
5. Advertisements on Facebook
Facebook advertising is perhaps the simplest and most successful way to attract targeted traffic to your website.
It has a lot of targeting possibilities, so you can show your advertising to the proper group of Facebook users who are more inclined to become your clients.
6. Guest Posting
Publish your guest pieces on a well-known blog with a link back to your website. It helps you exhibit your experience in your industry and position yourself as an authority, in addition to increasing traffic.
7. Forum Posting
While most people don’t appear to pay much attention to forums these days, when done right, they can be a goldmine of traffic. Perform a Google search for “keyword + forum” to find a list of forums to join.
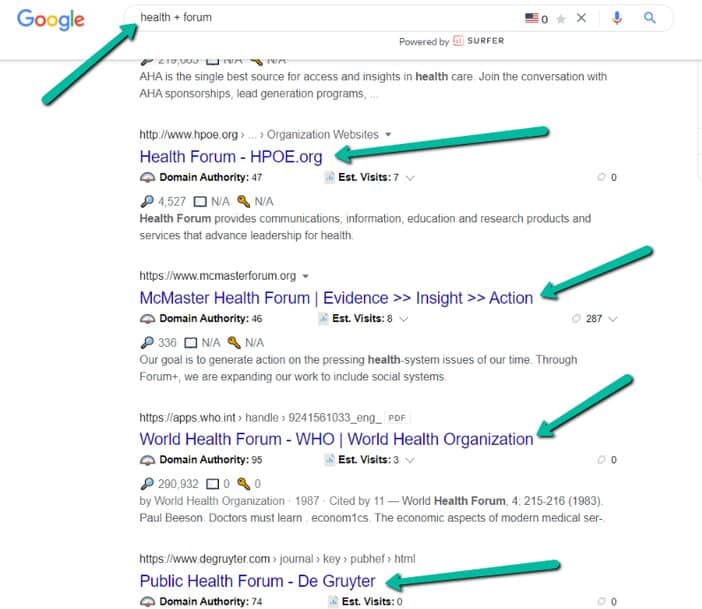
The search operator to employ if your blog is all about fitness is “fitness + forum.” After you’ve signed up, make an introduction and begin participating in the Forum.
Make sure to update your profile and include your forum signature as well. Insert a link to your blog with a captivating heading in your forum signature.
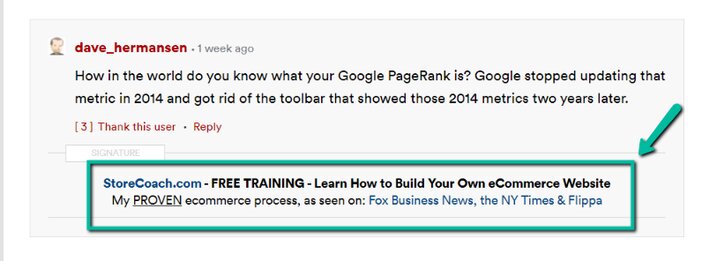
Your signature will appear all over the platform as you become more active on it by sharing your opinions and answering questions. This will increase your visibility and possibly lead to a visit to your blog.
8. Answering Quora Questions
This website is great not only for creating blog article ideas but also for increasing visitors. When done correctly, Quora may bring a truckload of traffic to your blog.
So, what’s the right course of action? Simple. Go to Quora and look for a keyword that is related to the blog article you want to promote.
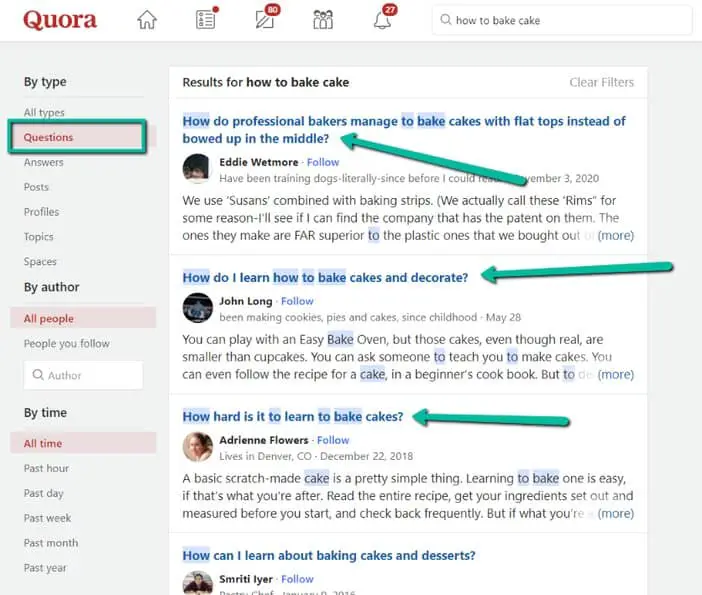
Once you stumble on a topic that one of your blog posts covers, answer it with your blog’s content and a link back to it.
You might be wondering if you can gain visitors with this strategy. Take a peek at these responses to see how many people have viewed them so far.
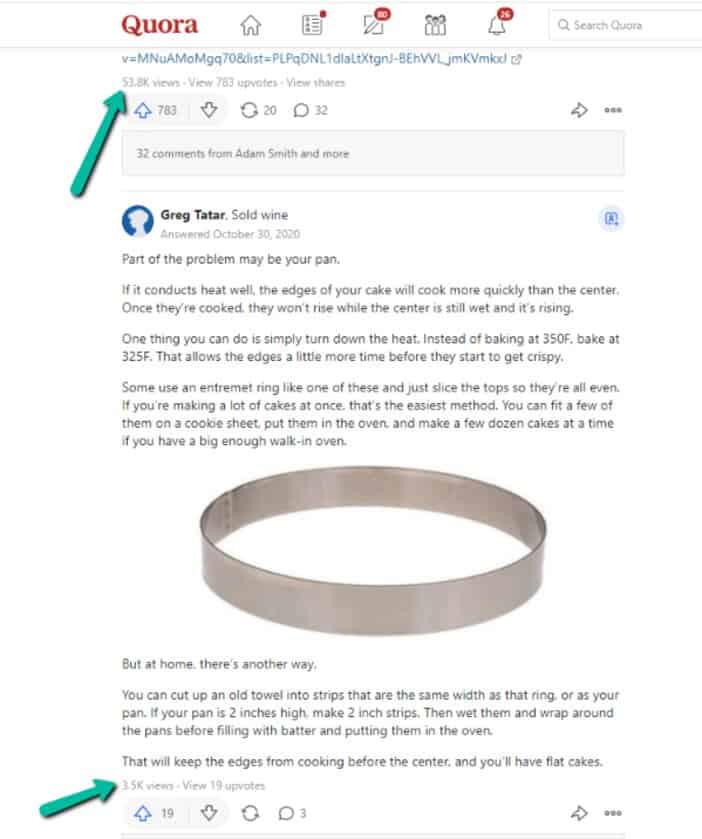
Do you see the numbers? Take notice of the fact that some replies contain hyperlinks. The majority of those links go to a blog article.
Would you accept that a small percentage of persons who saw those responses must have visited the links to those blogs?
Imagine only having to answer four questions every day. Assume that each question receives 400 views, which is a conservative estimate. You would have received 48,000 views after answering 90 questions for 30 days.
Even if only 30% of those who saw your answer went on to read your blog that would be over 14,000 monthly visits. This is a good amount of traffic for a new blog.
SEE: How To Make Money Blogging: 8 Ways To Monetize Your Blog
FAQs
Are WordPress plugins free or paid?
There are both free and premium WordPress plugins. The WordPress plugin catalog has a large number of free plugins. The majority of free plugins have limited functionality, which is provided for in the commercial version.
However, certain free plugins are fully functional and do not require you to switch to the paid version.
What are WordPress plugins?
WordPress plugins are simple web programs that assist your website’s functioning. It serves as a software program that contains a set of specialized functions.
WordPress plugins are PHP programs that are written in the PHP programming language and hence work with WordPress effortlessly.
Is it possible to build a website anonymously?
Yes, but if you want to run a website while remaining anonymous, ensure your domain is protected with WHOIS privacy enabled.
People frequently write under a pseudonym on anonymous platforms. You can also create a separate email address solely for site management.
Conclusion
There you have it, a detailed guide on how to create a blog even as a complete beginner with no previous knowledge.
As you can see, you don’t require the services of any programmer or coder to set up your blog for you.
At this point, what is left for you is to sign up to HostGator and follow the steps outlined in this post to set up your first blog.
Tosinajy tells you how to make an income online, the tools you’ll need, and how to cope with typical problems you may encounter in the process.
Thanks for reading
Ready to create your blog using HostGator?
Click the link below to sign up for a hosting account with HostGator, which comes with a one-year free domain.

